Thursday, November 3, 2016

German Pancakes

Since I homeschool (online) my kiddos, I make breakfast everyday.  And when you're making breakfast practically everyday of the week, you needs some options in your recipe repertoire! Here's one that I found years ago, and decided to make this morning. It's super easy, and feeds approx. 6 people.

German Pancakes
6 eggs
1 c. flour
1 c. milk
1/2 tsp. salt
1/2 tsp. vanilla
2 Tbsp. melted butter
berries, syrup, powdered sugar, whip cream (optional)

1. Preheat oven to 400.
2. In a 9x13 casserole dish/baker, add the melted butter, making sure to coat pan entirely.
3. In a blender, carefully crack the 6 eggs into a blender. Add the flour, milk, salt & vanilla. Blend for approx. 30 secs. Pour out into the prepared 9x13 dish, and place in oven for 20 minutes. When it comes out it will be very puffed up, but will flatten a little with time. Cut into 6 squares, and serve with fresh berries, syrup and a sprinkling of powdered sugar. You could also add a dollop of whipped cream if you desire.


Monday, October 24, 2016

Shepherd's Pie My Way

It's fall in Colorado again, and so I'm bringing out the comfort food recipes again.  And one of the best comfort food categories is casseroles.  I'm not sure if shepherd's pie is technically a casserole, but...works for me!  I'm sure everyone has their "secret ingredient", but I'm willing to share my secret for adding some great flavor to a slightly bland dish. Instant stuffing!! Yep, no rocket science here. But if you are a fan of the instant box stuff, then you'll be willing to try it too. I suppose you could also use a recipe of fresh stuffing/dressing, but I leave that for the holiday turkey dinners. Here's my version of shepherd's pie:

1 lb. ground beef
1 16 oz. package of frozen mixed veggies (your choice)
2-3 medium sized potatoes, peeled, boiled and mashed (or use instant for ease)
whatever spices or additions you want for flavor in the meat & veggies (i.e., Worcestershire sauce, salt, pepper, garlic salt, etc.)
1 regular box/package of instant stuffing (I prefer chicken flavor), prepared and cooked.

1. Preheat your oven to about 350-375 degrees.
2. Fry up your ground beef until browned well, adding your desired seasonings/spices. Drain the grease/fat if you have any.
3. Preheat your veggies, then add them into the cooked meat, and mix well.
4. In your baking dish, add a little cooking spray. Then scoop out the stuffing into your baking dish evenly, patting it down. Then layer on the meat & veggie mix evenly. Next evenly spread out the mashed potatoes over the whole thing. You can sprinkle a little cheddar cheese and parsley, if you so desire.
5. Place it in the preheated oven and cook for about 20-30 minutes, until the top is lightly golden brown.
6. Serves approximately 4-6.

Tuesday, January 26, 2016


Posole


2-3 lbs. cubed pork

2-3 lbs. hominy (posole), drained

2 (8oz) cans of tomato sauce

¼ c. chicken bouillon granules (caldo de pollo or caldo de tomate)

Spices (chili powder, paprika, cumin, oregano, cilantro, garlic pdr., salt, pepper – all to taste)


Combine all ingredients in crock pot and cook on high for 4-5 hours, or low 8-9 hours,  OR cook in big pot for approx. an hour or so on low to medium simmer, until pork is tender.

Thursday, September 18, 2014

Since Fall is around the corner (next week!), it's time to fire back up the oven and do some baking again!  For most of us, pumpkin is definitely the go to item in the Fall, so I took a trusty cinnamon oatmeal muffin recipe, and tweaked it slightly for the occasion!

Pumpkin Chocolate Chip Oatmeal Muffins

1 1/3 c. flour
3/4 c. oats
1/3 c. brown sugar
2 tsp. baking powder
1/4 tsp. pumpkin pie spice, or cinnamon
1/4 tsp. salt
3/4 c. milk
1/4 c. oil
1 egg
1/2 c. canned pumpkin puree

Combine first 6 ingredients in a medium size bowl.
Add the remaining "wet" ingredients until just combined.
Divide into greased muffin tin (or use muffin liners).
Bake at 400 degrees, for 15-20 minutes.


Since I live in the Mile High City of Denver, this recipe has worked perfectly for the high altitude, so no adjustments are necessary.

Tuesday, December 17, 2013

Kroger Skillet Meals Review

My family absolutely enjoyed the Kroger Skillet meal, garlic bread and salad kit. We already use the salad kits on a weekly basis, since they are so easy, convenient and tasty! We always get the Caesar ones, since I have carrot allergies. Sometimes I just add a tomato or two for some added veggies! I've always purchased the name brands of frozen garlic bread, but now that we've tried Kroger ones, I think I'll switch! In this pic we tried the rigatoni and sausage frozen meal, which was tasty.  Thanks to BzzAgent, I got to try this for free!!!

<img src="https://img.bzzagent.com/image/krogerSkillet.jpg?Type=activity&Activity=3647044256&Campaign=4400734910&Uid=1436015&token=7649188308db0ba054d2abe846b7329d" alt=""/>
 

Thursday, December 12, 2013

Influenster - Suave Product Review

Since I'm a member of Influenster, I get to try products for free and write a review about them. The week of Thanksgiving, I received my SuaveFamily Box, which included FULL SIZE Suave Morroccan Oil Conditioning Mask, Suave Men's Body Wash, and Suave For Kids Detangler Spray.  My husband and son already use the body wash on a normal basis, so were pretty happy to get a free one. They love this stuff! Get's them clean and makes them smell manly, not all girly with the usual body washes I buy.  My daughter absolutely loved the detangler spray, since she has semi-long hair which is often prone to tangles.  She said it worked good, and she really liked the scent.  I just happened to have recently bought the Suave Morroccan for Colored Hair Shampoo & Conditioner, and decided to try the shampoo I bought with the conditioning mask sample. OMGee! I absolutely love the scent and the way it both makes my hair smell and feel. So silky smooth!  You use the mask 1-2 times a week. I have used it once a week, and it's working wonders on my hair. Who says you have to spend a lot on professional brands when you can buy Suave! :)
 

Tuesday, December 3, 2013

Cranberry Orange Cookies

The holidays are here, and it's time to heat up those ovens and start baking yummy treats!  Here's a great recipe I got from a friend, and tweaked it just a bit, to accommodate the Denver altitude.

Large bowl:
1 C butter
1 C sugar
1/2 C brown sugar
1 egg
1 tsp. grated orange zest
2 Tbsp. orange juice
1 tsp. vanilla

Medium bowl:
2 1/2 C flour (add 1/4 C more for high altitude, like I did)
1/2 tsp. baking soda
1/2 tsp. salt

2 C finely chopped fresh cranberries

~ Preheat oven to 375 degrees ~

1. Add all ingredients in "Large bowl", until smooth and creamy.
 
2. Add all ingredients in "Medium bowl".  Combine into "Large bowl, using an industrial-strength mixwe, or your bare hands. A little wooden spoon will NOT cut it with this recipe!
 
3. Once combined well, toss in cranberries, again mixing well with hands or something strong. Heck, score points with the husband and tell him you need his strength!
 
4. Scoop out into 2 inch amounts and place on ungreased cookie sheets or baking stones, about 2" apart. Remember to alternate pans for each batch, to have cool pans so cookie dough does not spread prematurely. 
 
5. Now this is tricky...the recipe calls for 10-12 minutes, but at out "Mile-High" altitude, I had to bake them for more like 20 minutes.  You'll have to experiment and keep an eye on your batches, until you can figure out the perfect time.

This recipe should make 48 cookies, but I guess it depends on the size you make them.  I doubled my batch to accommodate a Thanksgiving fellowship.

Oh, and almost forgot, there's a recipe for icing these, although I thought they were delicious as is, and didn't bother.  I'll add it though, just in case you want to!

Icing:
1/2 tsp. orange zest
3 Tbsp. orange juice
1 1/2 C confectioner's sugar (powdered)

Mix ingredients and spread over cooled cookies.


Thursday, October 10, 2013

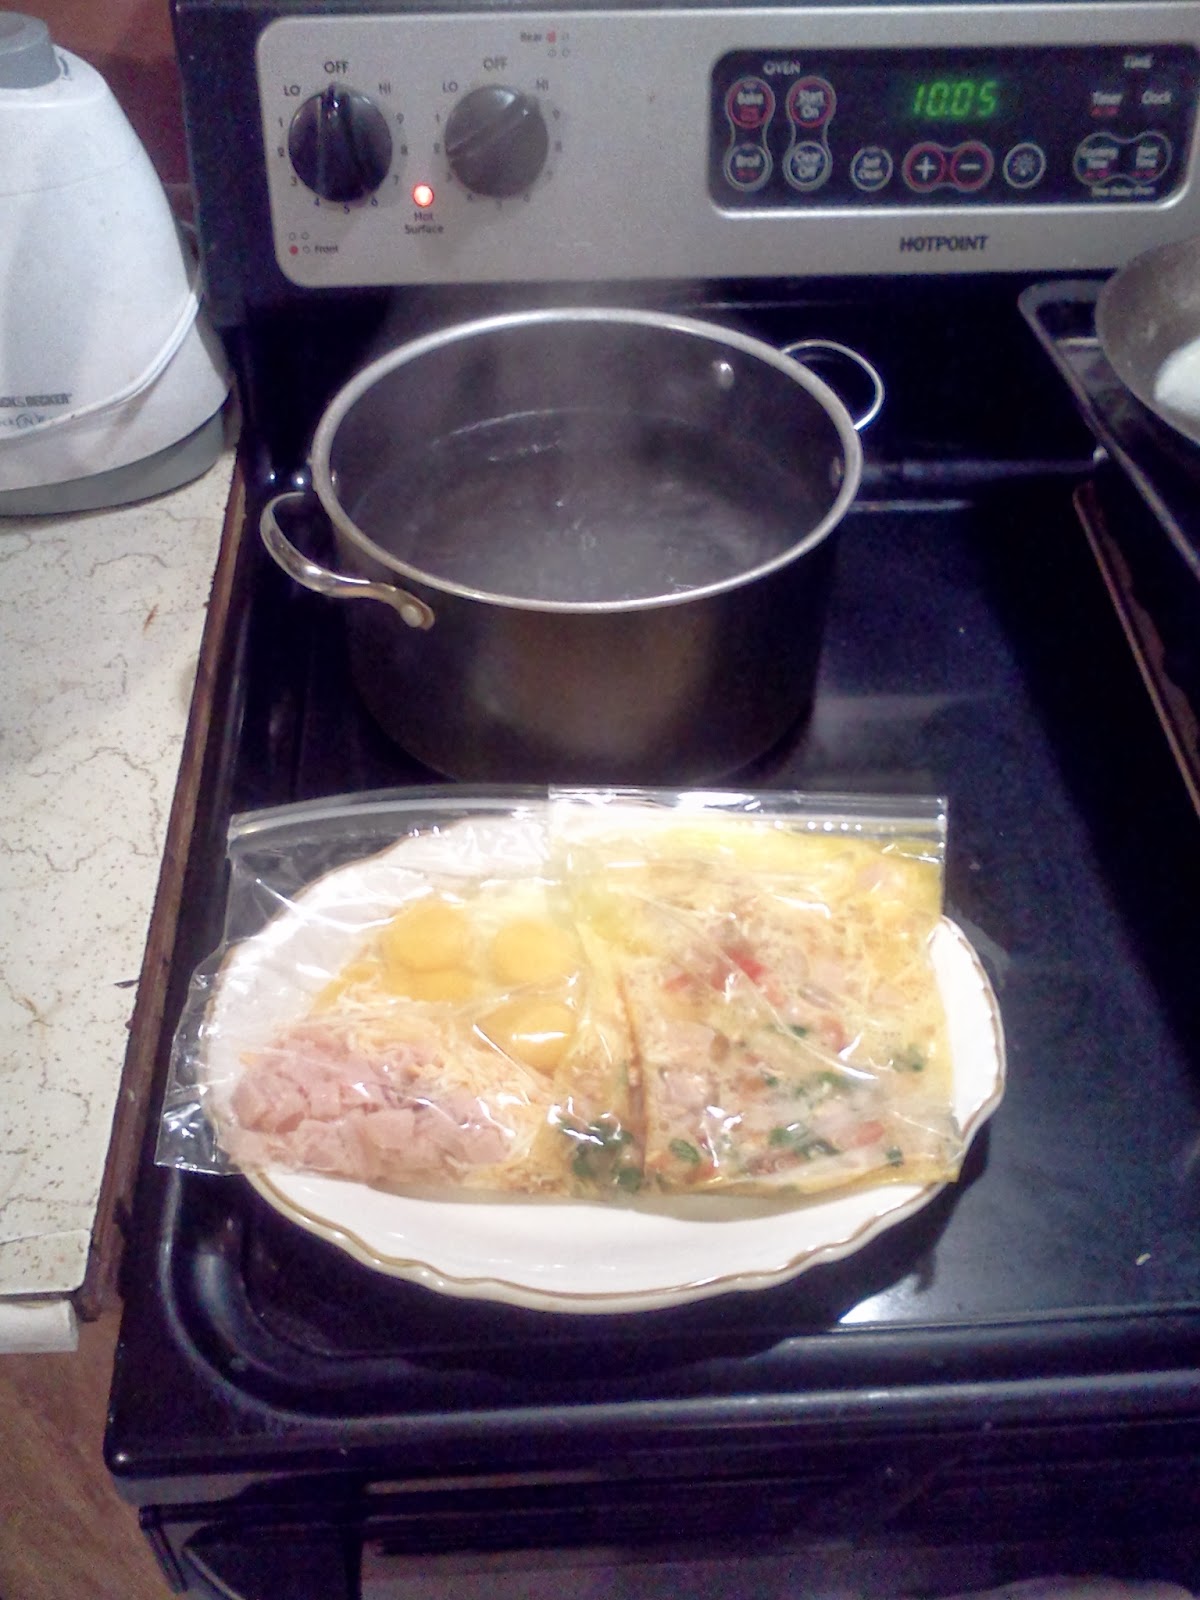
Easy Baggie Omlette

Recently my husband was reading a frugal finance book, and it mentioned making omelettes as a budget friendly and healthy meal.  He began to do an internet search for recipes and happened upon one that suggests making omelettes in a baggie.  I must admit that I was VERY skeptical about this method, but tried his finished product and was convinced it was a great idea!  Now mind you, this method is a bit longer than traditional pan frying!  But if you're like me, struggling to get the silly thing to cook evenly and not burn, you'll love this! I would definitely suggest experimenting with time and ingredients to suit your own personal taste, but here's a good starting point that works for us.

Omelette-In-A-Bag
1 ziplock-type sandwich baggie
2-6 eggs (depending on your diet!)
Additional ingredients per taste (cheese, chopped deli meat, diced veggies, spices, etc.)

1 - Start a large pot of water, bring to boil.

2 - While you're waiting for water to boil (and since a watched pot never boils!), pull out all your ingredients and seal them into the baggie, trying to remove as much air as possible.  Carefully squish it all up, until the eggs looked "scrambled".

3 - Once pot comes to full boil, add your omelette baggie and cook it at high boil for 15-30 mins, depending on how cooked you want it, and how many ingredients you use. The more ingredients seem to need a little bit more time for cooking.  Best way to check is to carefully press into the omelette and if it doesn't seem to seep any juice, it's most likely done.

4 - Turn off the burner, and remove the baggie with tongs.  Empty the omelette onto a plate, and voila! 

Happy eating!

Friday, August 9, 2013

Sooji Ka Halwa - Semolina Halwa

Some people think I have an obsession with anything Indian.  Well, according to Webster's Online definition, they are absolutely correct! 

~ Definition of OBSESSION ~
1: a persistent disturbing preoccupation with an often unreasonable idea or feeling; broadly : compelling motivation <an obsession with profits>
2: something that causes an obsession
~ Synonyms ~
Passion, enthusiasm, fascination, attraction, etc.
 
I would say that MOST people on this planet have an obsession of some kind.  Whether it's sports, cars, books, other people, fashion, religious conviction, and on, and on.  As a Christian, we believe that we are to have passion and zeal in loving and serving Jesus and people. 
 
So, yes, I have an obsession with India.  Want to know why?  Because God Himself put it there, and has verified it numerous times publicly and personally, to both my husband and I.  It goes beyond a cultural thing, even though it helps to know the many cultural aspects of the Indian subcontinent.  It's an unexplainable heart-wrenching, deep down inside, that when you see pictures of the people, when you hear of tragedies that beset them, both by default and design, or when you simply hear the speaking accent or the aroma of spices, you are instantly enraptured.  You choke up, tear up, take deep breaths so that you can gain composure, but no amount of mind-over-matter can truly cause this feeling to dissipate.  It's especially obvious, when only so many years previous, you can remember the times a relative took you to eat Indian food, of which you swore you'd never, ever eat again.  Or the times you'd call a customer service center, and demand the desperately-trying-to-speak-English Indian to connect you to someone that can speak English clearly and understandably!  And again, when you know beyond-the-shadow-of-a-doubt that you'd {previously} never give up wanting to own a happy American home, and would never leave the safety, comfort and cleanliness of American soil.  And here you have come full circle, wondering what life will be like in so many different circumstances, when you finally do go to that country, of which God has called you to (definitely NOT your original "white picket fence" plan).  Yes, I've been there once, and it definitely scared me and brought me to my knees!  But at the same time, I am still compelled to return.  I'll never forget the moment we (husband and I) were in the worship service of one of our sister churches in India, and the overwhelming voice of God telling me that these people needed someone to share His Gospel with them.  Other churches had closed down in Mumbai and Navi Mumbai, and He reminded me of that.  "Who will reach them for Me?"  I broke down and told Him, "here am I, send me."  Recently, I was questioning how it would be possible for us to reach them, and God quickened to my heart that it would not be on mine or my husband's ability, but on His.  We will merely be His instruments, and it'll all come from Him.  Not my strength, but His. 
 
So, in my continual pursuit of widening my Indian cooking skills, and keeping the dream alive in our home, I have found a wonderfully tasty recipe, that just tonight I made successfully!  If you like Cream of Wheat or Malt-O-Meal, your sure to enjoy this treat!


Sooji Ka Halwa Recipe
By , About.com Guide
http://indianfood.about.com/od/sweetsanddesserts/r/Sooji-Ka-Halwa-Semolina-Halwa.htm

Cook Time: 20 minutes

Total Time: 20 minutes

Yield: Serves 4

Ingredients:

  • 1 and a 1/2 cups sooji/ rawa (semolina)
  • 1/2 cup ghee (clarified butter - super easy to make at home, just google it!)
  • 3/4 cup mixture of cashews (coarsely chopped ) and whole raisins/ sultanas
  • 3 cups hot water
  • 1/2 cup whole/ full cream milk (half & half works splendidly)
  • 1/2 cup sugar
  • 5 pods of green cardamom split open

Preparation:

  • Heat a deep pan on a medium heat and when hot add the ghee. When it melts, add the Sooji and mix well.
  • Roast the Sooji (stirring frequently) till it begins to turn a very light golden color and give off a faint aroma. The roasted Sooji will have the grainy consistency of wet sand. Now add the cashews and raisins to the Sooji and mix well.
  • While you are roasting the Sooji, in a separate pot and on medium heat, bring a mixture of the milk, water, sugar and cardamom to a boil, stirring often.
  • When the Sooji is roasted, gently add the water and milk mixture, stirring all the while to prevent lumps from forming. If any do form, make sure to break them with the back of the stirring spoon so you get a smooth paste-like consistency. Cook the mixture till it is thick and begins to come away from the sides of the pan.
  • Turn off the heat and allow the mixture to cool to a warm temperature. Serve now in individual bowls.

Monday, May 27, 2013

Kroger Fruit Smoothie Bars

Now that I'm a BzzAgent I get to try all kinds of free products (full size, mind you!), and in return I share my opinions and give reviews. Today's is about the Kroger Fruit Smoothie Bars.  BzzAgent sent me some coupons in the mail, one specifically for me to get a free box of these frozen treats from my local King Soopers.  Once I brought them home, I passed them out to my husband and kids to try, along with one for myself.  My kids thought they were pretty good, but didn't seem overly impressed.  My husband like them so much that he ate another one that night, and again had one last night!  I personally thought they were pretty good, although I'd liked them to have been a little sweeter, and possibly bigger.  We tried the Strawberry Banana flavor.  It really did taste like a strawberry banana yogurt that was frozen on a stick.  There were actual chunks of strawberries and bananas inside.  Pretty good in my opinion, and possibly an occasional item I would purchase when desiring a frozen treat.

<img src="https://img.bzzagent.com/image/krogerIndulge.jpg?Type=activity&Activity=6584360540&Campaign=7316548998&Uid=1436015&token=84be9361b0a38c133f751011b2d6f03e" alt=""/>

Wednesday, April 24, 2013

Private Selection Chocolate Molten Upside Down Cake Review

So, recently I signed up for something called BuzzAgent, and although it took awhile to be offered my first campaign, now that I have, I'm loving it!  You get full-size samples to try, and review through avenues like Twitter, Facebook & blogging.  So, here's my first review!

Once I qualified for and received an invite to the PS Upside Down Cake campaign, I was able to immediately download an e-coupon onto my King Soopers "soopercard".  I then went to my local King Soopers, picked out one of three yummy flavors, brought it home, and followed the directions on the box.  Wow!!!  This was extremely delicious!  So thick, and fudgy!  I gave us pretty big portions, and I was personally unable to finish mine because it was so rich and chocolaty.  This is a choco-holics nirvana!!!  A day later, I warmed up another piece for each of us, and a friend, and it was still super yummy, even from the microwave!  Original price in my local store was $9.99, and I would say that it's totally worth every penny I would've spent (remember, I got it free to try!).  You can probably find it in most King Sooper and Kroger grocery stores.

 <img src="https://img.bzzagent.com/image/upsideDownCakes.jpg?Type=activity&Activity=7238570407&Campaign=7070231598&Uid=1436015&token=58f307755c98633c0a712226572b9b7e" alt=""/>

Tuesday, November 13, 2012

Diced Pork with Rosemary & Thyme

So they say that "necessity is the mother of all inventions".  Well, after making my roast last week, I had leftover herbs that I need to use before they spoil.  And I had a huge package of diced pork, which I needed to split between the plan of green chile and something else.  I kept finding all sorts of recipes for pork loin with rosemary & thyme, but nothing using diced pork specifically.  So, I took the roast recipe and tweaked it in my usual "Heather experimenting style", and lo-and-behold, a new recipe is born!  (And a very good one, if I do say so myself.)  ;)
Pressure-cooked Diced Pork with Rosemary & Thyme Stew
  • 2 lbs. diced pork
  • 2 Tablespoons Olive Oil
  • 1 onion, chopped
  • 2-3 cloves garlic, minced
  • 4-5 potatoes, peeled and cut in bite-sized chunks
  • 2 whole Carrots, cut in bite-sized chunks
  • 1 zucchini, cut in bite-sized chunks
  • 1 16oz. container of sliced mushrooms
  • Salt & pepper, to taste
  • 1 cup red cooking wine
  • 2 cups To 3 Cups Beef Stock/broth
  • 2 tsp. beef bouillon granules
  • 3 sprigs each fresh thyme and rosemary, roughly choppedor more to taste
  • 1 can cream soup (I used celery, but chicken or mushroom would work too)

  • Heat oil in 8qt. pressure cooker, uncovered on medium-high heat.  Add pork and brown.  Then add onion and garlic, stirring for a couple minutes. Add remaining ingredients (except cream soup) into pan, then cover with pressure cooker lid and follow manufacturer instructions, brining to pressure and cookingn for about 40 mins.  Remove from heat, and either use quick release or wait for natural pressure release, about 15 mins.  Once done, stir in the canned cream soup, and serve.

    (Note: I'm pretty sure you can cook this without pressure-cooker, using either a regular stew pot, cooking slowly on low, or crockpot.  You'll have to just play with it and see what works best. Our pork came out so very moist, and so you should also aim for a nice fall-apart pork as well.)

    Thursday, November 1, 2012

    Perfect Pioneer Pot Roast

    Well, this is the time of year when you bring back the comfort foods! You know, the ones that are both hearty and help warm up the house.  Especially the ones that cook all day and fill your house with the most amazing aromas, and make you wish it was dinner-time!  On my last grocery shopping trip I decided to pick up a roast.  Now I have to say that I've always imagined these tasting better than I have ever cooked them, so a little reluctance and resignation accompanied my decision.  You see, I just didn't ever have a great recipe.  My roast always tasted pretty bland and disappointing, and so decided it was time to scour the internet (yet again) for a better recipe.  Lo-and-behold, "eureka! I found it!" Of course I cannot take credit for it, but definitely wanted to pass it on to my friends, family and followers.  I cannot even try to replicate the georgeous photography that The Pioneer Woman produced on her website, so I'll just aim you that direction.  I'll say that I tweaked it ever so slightly myself (adding potatoes and mushrooms to mine), and my son even added his own condiment of choice to the meat (bbq sauce!), but all in all, it turned out to be one of the best tasting roasts I've ever made!  Reminiscent of Mimi's Cafe (well, at least in my simple mind), lol!  Here's the link...hope you enjoy it as much as we did!
    http://thepioneerwoman.com/cooking/2011/09/2008_the_year_of_the_pot_roast/
     

    Thursday, October 11, 2012

    Fall = Casseroles

    Okay, so the lazy months of summer are well past, and homeschooling has resumed smoothly enough.  The cooler weather has returned, which means it's time to turn up the heat and make our homes cozy.  How better to do that than to turn on the oven and make a simple dinner, and throw in a sweet treat while we're at it.  So, in honor of the wonderful invention of the casserole, here's a family favorite that I grew up eating, quite often.  You can either use pork chops (that have been browned in a frying pan with a little oil first) or diced chicken.  Don't forget to have a great recipe for cookies or sweet bread while you have a preheated oven!

    Chicken (or Pork Chops), Potatoes and Mushroom Soup Casserole
    1-2 lbs. diced boneless, skinless chicken breast
    6-8 potatoes, peeled and sliced thin
    2 cans cream of mushroom soup (use can to add 1/2 - 1 full can amount of milk)
    salt, pepper, garlic salt (to taste or optional)

    Super simple instructions!
    Grease a 9x13" baking pan, then toss it all in together, then cook for 1 hour, at 400 degrees.

    Serve with additional veggies or salad of choice.

    Monday, November 7, 2011

    Once again, it's my favorite season here in Colorado...Fall (aka Autumn)!!!  I love when the weather turns brisk and cool, when the leaves on the trees give way to the beautiful colors underneath and begin to fall everywhere.  My thoughts turn toward bundling up in blankets and sweaters, and of baking scrumptious treats!  One of my all-time-favorite recipes for this time of year is chocolate chip pumpkin bread.  I made some Saturday, and my house smelled wonderful.  I then brought my "offering" to Sunday morning coffee fellowship and it was devoured quite quickly.  And again, I was asked for another recipe, and responded with, "it'll be on my blog"!  :)

    Chocolate Chip Pumpkin Bread
    1 3/4 c. all purpose flour
    1 1/2 tsp. pumpkin pie spice
    1 tsp. baking soda
    1 tsp. baking powder
    3/4 tsp. salt
    1/2 c. (1 stick) unsalted butter, room temperature
    1 1/4 c. sugar
    3 large eggs, beaten
    1 c. canned pumpkin
    1 tsp. vanilla
    1/3 c. milk
    3/4 c. chocolate chips

    1. Preheat oven to 350 degrees. Prepare the bottom & sides of loaf pan with butter & flour.
    2. In medium bowl, sift together first 5 ingredients.
    3. In large bowl, beat the butter until smooth. Add sugar and beat a little longer.  Then add the eggs and beat. Add the pumpkin and vanilla, beat some more.  Beat in flour mixture, alternately with the milk.  Finally, stir in the chocolate chips.  Pour into prepared pan and place on center rack in oven.  Bake for 55 minutes, or until completely cooked.  (You can insert a toothpick in the middle, and if it comes out clean, the bread is done.)

    Monday, October 10, 2011

    Tator-tot Bake

    One of my family's favorite casseroles is this one, unless of course, I have burned them out on making it too many times.  I have even made it for friends, who are almost convinced that this is one of my own personal inventions.  But, truth be told, I found it from another source.  Not sure where, but I guess that doesn't matter.  When our friends hear tator-tot bake, they think of us.

    Tator-tot Bake
    1 lb. ground beef
    1 can green beans
    1 can cream of chicken soup
    1 can cream of mushroom soup
    handful of cheese (cheddar or preferred)
    1 bag frozen tator-tots

    1. Brown ground beef, drain, then pour into casserole dish.

    2. Add the cans of green beans and both soups, with ground beef and mix well.  Sprinkle cheese evenly over meat/soup/green bean mixture.  Place desired amount of tator-tots on top (I use about 3/4 of the bag).

    3. Bake about 25-30 minutes at 450 degrees, or until tots are well cooked and cheese has thoroughly melted.

    Serves about 4-6, depending on serving size.  You can serve with some bread or a salad. 

    Tuesday, October 4, 2011

    Chorizo Tacos

    Ground pork is a pretty cheap item to purchase.  It seems to be cheaper than ground turkey and beef, so when I'm on a budget, it's one item I reach for while shopping.  Problem is, I don't really like the flavor of it. However, I have 2 pretty good recipes for using it, and this one is pretty popular with my family.  Very cheap and easy to prepare.

    Chorizo Tacos
    1 lb. ground pork
    1/2 tsp. salt, pepper
    2-3 tbsp. chili powder
    1 tbsp. oregano
    1 tsp. ground cumin
    1/2 tsp. sugar
    2 tbsp. cider vinegar
    1 1/4 tbsp. water
    2-3 cloves garlic, minced
    1 8oz. can green salsa (Herdez is good)
    Handful of shredded/grated cheese (cheddar is good)

    1. Add all ingredients (except salsa & cheese) in medium bowl, mix well. Cover and refrigerate for about 30+ mins.

    2. Fry chorizo until completely cooked.  Then add salsa and cheddar, mixing well.  Once the cheese has melted, remove from heat.

    3. You are now ready to place about 1 tablespoon of the chorizo onto warmed corn tortillas. Garnish with desired items (lime juice, more cheese, cilantro, onion, etc.) or just as is. 

    Friday, September 30, 2011

    Scalloped Potatoes (au gratin) & Fruit Pizza

    If you know my family, we LOVE to have people over for food!  Whether it's for a weeknight dinner, a Sunday lunch or just coffee (or ice cream, lol), we enjoy spending time with others.  Since my pastor's wife is out of town visiting her family, we decided to invite our pastor over for dinner.  Yes, we know our pastor.  One of the blessings in going to smaller church (not mega-church), is that you actually KNOW your pastor and his family.  We've actually had them over quite a lot in the 3 years they've been here.  So I've had the chance to make many different meals.  One favored (and often requested) meal is scalloped potatoes (also called potatoes au gratin).  Since I like cheese so much, I use a lot, but you can adjust your recipe to your family's personal taste.  I also use ham, but this can be a vegetarian dish if you want to just leave out the meat.  This is a great recipe for using up any leftover holiday ham pieces, or you can just purchase a ham steak.  I also am including a great recipe I found for Fruit Pizza.  A simple dessert that is very pleasing to the eyes, and taste buds alike! :)

    Scalloped Potatoes & Ham


    6-8 medium sized russet (brown) potatoes, peeled and sliced thin
    1 (1 lb.) ham steak or 2 c. leftover ham pieces, cubed thick or thin (according to preference)
    8-16 oz. shredded cheese (cheddar or one of many blend options)
    salt, pepper & garlic salt, to taste
    1-2 c. milk
    1 stick margarine/butter

    1. Place the potatoes, cubed ham, cheese and seasonings in a large bowl.  Mix well with your hand.

    2. Empty the mixture into a greased 9x13" baker or casserole dish.  Slowly pour the milk evenly over the mixture.  Take the stick of butter and cut little slabs of margarine/butter and place sporadically over the mixture.

    3. Bake for about 1 hour in oven.  I use 375-400 degrees, depending on how fast/slow I want it cooked.  You may also want to cover with aluminum foil for the first 45 mins., then remove foil for the last 15 mins.

    Makes about 6 servings.

    Fruit Pizza

    • 1 (18 ounce) package refrigerated sugar cookie dough
    • 1 (8 ounce) package cream cheese, softened
    • 1/3 cup sugar
    • 1/2 teaspoon vanilla extract
    • 1 pint fresh strawberries (halved), blueberries or raspberries, carefully rinsed
    • 2 kiwifruit, peeled and sliced
    • 1 (11 ounce) can mandarin oranges, drained

    • 1. On a pizza stone, press cookie dough into a 12-in. circle. Bake at 375 degrees F for 10-12 minutes or until golden brown. Cool completely on a wire rack.

    • 2. In a small mixing bowl, beat the cream cheese, sugar and vanilla until smooth. Spread over crust. Arrange the strawberries/raspberries/blueberries, kiwi and oranges over cream cheese mixture. Refrigerate for 1 hour.  

    Tuesday, September 20, 2011

    Heather's Homemade Fried Chicken & Gravy

    Since we have a visiting pastor from another country, I decided yesterday to make an all-American dinner of fried chicken, mashed potatoes & gravy, veggies and bread rolls.  It turned out very well, and even received accolades of "opening my own restaurant" and "making my own cookbook".  I may one day.  Meanwhile, I can proudly say that this recipe is totally my own!  I was craving some good fried chicken one night when my husband and son were busy at church.  With my new-found love of "tweaking recipes" and trying my own hand at spices, I was quite successful.  So, I decided to add my name to it. :)

    You can easily double/triple/etc. this recipe.  I quadripled the flour/spice and milk/egg mixes to accommodate about 12-14 chicken breasts.  Obviously the gravy recipe would change as well.  Oh, and I ran out of white flour, and used wheat, which worked out great! :)

    Heather's Homemade Fried Chicken & Gravy
    2 chicken breasts, boneless/skinless
    1-2 c. oil
    1 egg, beaten
    1 Tbsp. milk

    Flour & Spice Mix:
    1/2 tsp each: paprika, chili pdr., season salt, garlic pdr., onion pdr., parsley
    1/4 tsp each: salt, pepper
    1/4 c. flour (wheat or white will work)

    1. Preheat oil in skillet, on medium-high heat.

    2. Add all ingredients for Flour & Spice Mix into small size bowl.

    3. In separate bowl, beat together egg & milk.

    4. Take a chicken breast and dip in flour/spice mix, then dip in egg/milk mixture, then back in flour/spice mix, turning to coat. Place in skillet.  Repeat with additional breast.  Set aside remaining flour mix for gravy.

    5. Cook approx. 30 mins. or until cooked (no pink), turning over about halfway through.  Once completely cooked, remove chicken pieces from pan and drain on paper towel-lined plate.

    Gravy
    Remaining flour/spice mix
    Additional 1 c. flour
    1 tsp. chicken bouillon
    salt & pepper, to taste
    Drippings from cooking chicken, drained of grease
    1-2 c. milk

    In separate pre-heated pan, add flour/spice mix remains and additional flour, browning for about 1 minute on medium heat.  Add drippings, milk, bouillon and salt/pepper, stirring continuously with wire whisk.  Heat until thickened, about 3-5 minutes.  Remove from heat.  Serve over chicken, with mashed potatoes or other desired side dish.

    Monday, September 19, 2011

    Tres Leches (3 Milks Cake)

    Last night, at church, we had a fellowship (food!), after our evening service, in honor of our visiting international pastor.  Despite it being a last-minute planning of who-brings-what, it turned out wonderfully!  We had albondigas (spanish meatball soup), beans, rice, papitas (fried potatoes), enchiladas, fresh tortillas, green chile, cream cheese salsa and chips, other assorted items, and tres leches!  It was truly a feast!  Both for the eyes, but also for the taste buds.  Most everyone was impressed with my tres leches cake, and so here I provide the recipe.  Obviously, I don't keep recipe "secrets". Oh, and this is a very simple "gringa" (white girl) version.
    : )

    Tres Leches
    1 yellow/vanilla box cake, prepared as directed on packaging, let cool
    1 14 oz. can sweetened condensed milk
    1 12 oz. can evaporated milk
    4 cups whole milk or whipping cream
    1 8 oz. container of whipped topping, thawed
    some cinnamon to sprinkle on top

    1. Prepare cake as directed.  I actually used additional milk in place of the water called for in cake batter. Bake per directions, then cool completely.

    2. Mix together sweet. cond. milk, evap. milk and whole milk/whipping cream.

    3. Poke a bunch of holes (using fork or something the size of a pencil) all over the cake.

    4. Slowly pour the milk mix over the entire cake, allowing it to soak up the milks.

    5. Cover and refrigerate for a couple of hours, again, allowing cake to soak up milks.

    6. Before serving, top with whipped topping and sprinkle with some cinnamon.  You could also replace the cinnamon with fresh berries on top.

    Now I was actually able to double up this recipe with 2 box cakes.  Then I added about an additional cup of whole milk into the milk mixture.  Worked great!